How to Use Google Forms
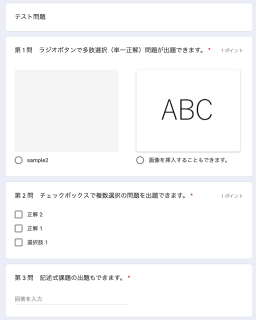
Sample page of a mini exam created with Google Forms
(Click on the picture to jump to the sample page)
Google Forms can be used to conduct questionnaires and mini exams for students during classes. This page explains the process in 4 steps, as outlined below.
1. Sign in to Google
2. Access Google Forms and create a new form or a quiz
3. Check form settings and share with students
4. Check responses to a form
1. Sign in to Google
First, sign in to Google. Both private accounts and Kyoto University G Suite accounts (@kyoto-u.ac.jp) can be used.
2. Access Google Forms and create a new form or a quiz
- Access Google Forms (https://docs.google.com/forms/u/0/)
- Under the "Start a new form" section, click "Blank" or "Blank Quiz".
- A new form or a quiz opens.
(Reference) G Suite Learning Center "Get started with Forms Quizzes: 1. Create a quiz" https://support.google.com/a/users/answer/9310255?hl=en#1.1
【Differences between a form and a quiz】
Form: You can use it as a questionnaire.
Quiz: You can assign points to questions and grade answers automatically.
2.1. Using Google Forms to create a new quiz and answer key
Things you can do with the Quiz feature
- You can assign points to questions and grade answers automatically. You can also assign partial points.
- You can create short answer questions and multiple choice questions.
- You can add YouTube videos and images to questions.
- You can show different question scenarios based on answers.
- You can randomize question order.
- You can check frequently missed questions, percentage of correct answers, average scores, median scores, and other metrics.
- You can release grades immediately or send them via email later.
- You can export grades in CSV format.
General procedures to create a new quiz and answer key
- On a newly created quiz form, click the settings icon on the top right and select the "Quizzes" section from among the "General", "Presentation" and "Quizzes" options. Click "Make this a quiz" and validate it, and then click "Save" on the top right.
- Enter the name and description of the quiz.
- After you add questions and selected question types, click "Answer key" in the bottom left to assign correct answer(s) and points for each question.
- If you use a quiz to check attendance, add questions that ask "name", "student number" and "email address", and make the questions "Required". Assign 0 points to these questions.
※ For more specific instructions on creating quizzes, please refer to the Google help page below.
https://support.google.com/docs/answer/7032287?hl=en
【List of question types】
Reference links
※ Instructional videos provided by Google for Education
Creating Quizzes https://www.youtube.com/watch?v=Lt5HqPvM-eI&feature=youtu.be
Grading https://youtu.be/EV3Z2bGCDuk
Sharing scores https://www.youtube.com/watch?v=CgAwH8SxFAk&feature=youtu.be
2.2. Using Google Forms to create a questionnaire without grading
If you do not validate "Make this a quiz", you can use the form as a questionnaire.
Things you can do with the Form feature
- You can create short answer questions and multiple choice questions.
- You can add YouTube videos and images to questions.
- You can show different question scenarios based on answers.
- You can randomize question order.
- You can release questionnaire results immediately or send results via email later.
- You can export results in CSV format.
General procedures to create a new form
- Enter the name and description of a newly created form.
- Add questions and select question types.
- If you use a form to check attendance, add questions that ask "name", "student number" and "email address", and make the questions "Required".
※ For more specific instructions on creating forms, please refer to the Google help page below.
https://support.google.com/docs/answer/2839737?hl=en
【List of question types】
Reference links
※ Google Forms Tutorials provided by Google for Education
https://www.youtube.com/playlist?list=PLP7Bvyb3ap47AiejbtiOXBKBPhqqJiaUr
※ Instructional videos provided by a Google-certified innovator (only in Japanese)
https://youtu.be/Iq3Y6NqWadY
3. Check form settings and share with students
You can check and change the settings of the quiz or form you created by clicking the settings icon. This allows you to do the following:
- Change whether to limit students to one response (If you choose to limit this, you need to sign in to Google)
- Change whether to allow students to edit responses
- Change whether to allow students to view overall results of questions (in the case of forms)
- Change whether the students can view their errors, the correct answers and their scores immediately after submission (in the case of quizzes)
- Change the confirmation message that appears after submission
By clicking "Send", you can select the method for sharing results with students.
- Sending the form via email
- Getting a link to the form
- Getting information to embed the form on a website
Please refer to the link below for more details.
https://support.google.com/docs/answer/2839588?hl=en
4. Check responses to a form
You can check responses in Google Forms.
- By clicking "Responses" on a form, you can check responses in "Summary", by "Question" and by "Individual".
- By clicking the "Create spreadsheet" icon on the "Responses" section, a Google spreadsheet opens in a new tab and you can check the responses of each student.
- After the Google spreadsheet opens, click the "File" tab and go to "Download as". Select "Comma-separated values" to download responses as a CSV file. Results can be downloaded in other formats as well.
- Click the three-dot icon on the top right of the "Responses" section, and then select "Download responses (.csv)".
Checking responses in a spreadsheet
Downloading as a CSV file
Please refer to the link below for more details.
https://support.google.com/docs/answer/139706?hl=en&ref_topic=6063592
